Tipt trial
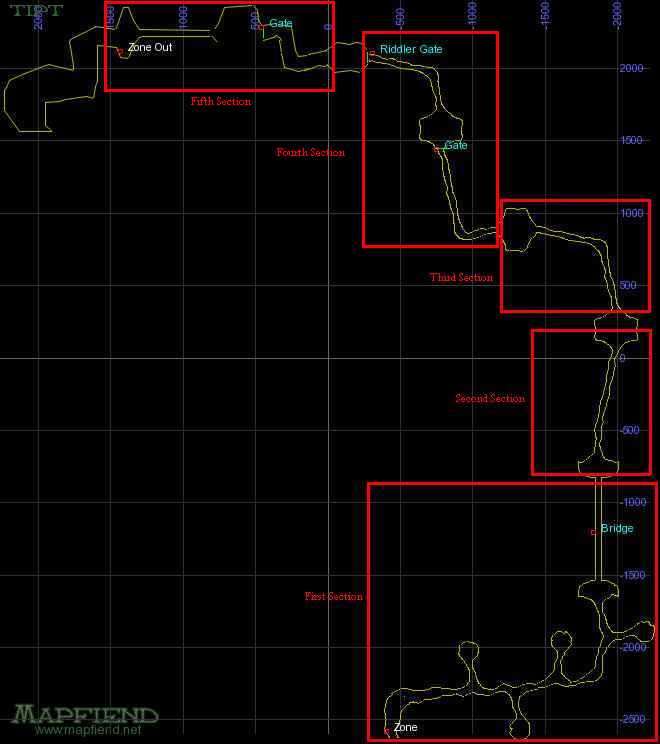
First of all, here's the best map I could find and it uses a map uploaded to www.mapfiend.net, a great site, use it, hug it, put the maps on the ceiling above your bed so you don't get lost.
General Overview
There's a few basic things to remember each Tipt run. Every single one is slightly different but has some things basic to it.
1) Group choice, this is often the most critical piece of any 6 person trial. If the trial is trivial in toughness for your group you can often be more flexible, whether it's the PoJ trials, Tipt, or MPG trials. If its non trivial you usually have to carefully pick who can come per run which often means only 1-4 new flags per 6 people. Any Tipt trial first needs to either have crowd control or a very experienced puller. Any Tipt trial group also needs to be prepared for the final named (details at the end of this), since you can kill dozens and dozens of the trash and it will be meaningless if you can't beat the final named if your looking for the flags. It's decent xp usually though even on a fail.
2) All 6 of the GoD trials in Barindu used a new engine of dynamic spawns it seems. I'm not sure what the proper name for it is but what it means is that when you clear an area, the repops aren't always in the same spots or numbers. They are chosen from a master list of potential spawn points with each trial and repop being different. This means that generally when you pull any area, first pull as many static mobs as you can since they provide a visual guide as to when patrollers will be starting to pop. I've seen 3 patrollers repop from where 1 was for example in the first section. Golem type pops seem to be immune to this in Tipt though, I've found them generally in the same spot each trial or close enough to make no difference.
3) All trash mobs in the trial have a max hit of slightly over 1000 I believe. Since I've mainly done it as a warrior lately the max has been around 980 or so per hit. Most proc 'Chaos Claws' which checks your lowest resists with a -150 modifier, making sure the tank has been buffed to 200-300 resists if possible can save a lot of damage spikes of 700hp + dot damage. Mob's attack ratings seem to go up deeper in, especially after the Riddler Gate.
Ikaav - proc/summon a 30 second ukun pet, cast nukes, gate, can use a reflect nuke aura at low hps (a white message warns you).
Noc - Rampage semi frequently
Mastruq - Cast a stun called Mastruq bellow that checks your average resists at -200 modifier. They have a Damage shield/Damage Reducer aura they can use at around 20-25% hps, it isn't always used but reduces each melee hit on them dramatically while hurting you. It can be dispelled I believe.
Cragbeast's - Proc a magical stun (ogre's aren't immune to that) called Crag Jaws, for 260hp, 1 sec stun
Ra'Tuk - Flurry and in about 1/10 cases in Tipt they will enrage, its rare but it can be a killing surprise
Golems - These have a faction that many are Kill on Sight to, but not all. However they seem to assist mobs anyway so trying to pull past can get you killed
Ukun - cast a snare called Ukun Chains, its a minor dot also. This isn't too hard to resist with 150 MR or higher, but just one fail can get your puller dead
Hynid - proc? a minor dot with a -20 MR check
Stonemite's - They have a proc with a small nuke + 15 minute dot effect, it has a -20 PR check
Kyv - often hasted by other mobs these seem to always have high dps. It may be that its just an impression, but treat each generally as a more serious fight than normal trash and you should live longer
Aneuk - these are all imbued with some cleric abilities like complete heal and gate, stun and mez can interrupt them but neither is guaranteed to not be resisted potentially. They also have a casted snare/dot checks your average resists at -150 modifier. This kills pullers with low resists
Cragbeast hatchlings - these are only in one section I'll describe later, they are immune to run speed changes but they don't run (unlike all but named and ghosts) and can summon. They have a wide aggro radius, sometimes shockingly so to people, its around 2/3 the width of their room, maybe 200' in game but directly line of sight
Undead - in one section are 8 undead with a 9th you don't kill that pops after for storyline text. The 9th can be aggressive depending on your faction status, most are non aggressive but I've seen him kill a few people. Each unnamed undead has a wide aggro radius, about 2/3 of the width of the room so being in line of sight gets aggro most of the time. Each undead chain pops a second one like Vex Thal mobs can.
First Section, Zone in to Bridge
The zone in is pretty much safe. I generally advise moving up to about 100' from the first stairs. Some patrollers can come as far as the base of the stairs, and there is a potential spawn point (see note #2 above) on the right side front of the stairs.
First pull several static mobs after watching to see what patrols, this lets your group get a feel for things without the danger of fighting in the middle of adds. When you have about 1/2 way to the bridge pulled (that's about where the dead end of the right connects), move the group up as a group. Don't risk meeting a patroller with the group strung out though, you want your group to be stopped and ready to heal/slow before the tank engages anything.
Generally you have about 8-14 mobs to clear to reach the bridge area.
At the bridge there's 2 golems, 1 to either side. The third golem patrol's the length of the bridge and while it often cuts short its route, it can walk up to directly between the left/right golems and aggro someone standing on top of the stairs in view. Generally I advise groups to rush the left pop when the patroller is far away. The tank/puller should move the mob away from the bridge itself into the corner, with healers/slowers moving in discrete runs between spells to the corner (so that they are there before the patroller comes back).
Next, wait for the patroller to be moving away from the group and about halfway down the bridge. This gives you space to edge onto the bridge and leave the right side golem up, and get a bit down the bridge to prepare for the patroller to come back.
When the patroller is dead, you have about 21? minutes of time to rest, take afk's, med to full mana, and go though fight details for the second section.
Second Section, Bridge to Enraged Maternal Cragbeast
The second section starts by pulling one of the golem's at the far end of the bridge, below the canyon ramping upwards. Generally I pull the left one first, let everyone get back to full mana (no matter how trivial the mana use was) and then move to just beyond that golem's spawn point (behind the rocks).
This hill section/named room is essentially timed and its why you want the group at full mana unless you have truly massive dps available. The hill generally has a Pooka static mob, a patrolling ukun, and 1-4 other static mobs on it. Sometimes one or two at the very top aren't visible from the middle of the hill. First pull the Pooka (be prepared for group chat of POOOOOOOOOOOOOOKA! etc). This is your warning of when the first repops are happening behind you later on.
Next if you can pull a second static, if you can't do that quickly due to patroller being in the way then pull the patroller. Next move the group up to the middle of the hill. Sometimes you can't move quite that far without pulling one of the potential spawns. Your ideal spot on this hill is far enough up that you can't aggro the Pooka if it repops behind. Having the group setup in a line across the trail instead of a more casual circle/oval cluster can help.
When all the mobs on the hill are dead, pick 3 people to be invisible. There is a trap up top that needs a minimum of 3 people in the room to trigger. The trap is a set of 6 cragbeast hatchlings that do NOT see invisible. Your 3 people go up, trigger them while invisible, then run back to your camp spot. The puller can then carefully drop his invisibility spell and edge up to pull the first hatchling. Each of these isn't too hard but they do summon and do need to be killed fast. They have a wide aggro radius of about 2/3rd the room size. They can be pulled single without FD split except for the pair on the right side if the puller is very careful or has done a few times. Otherwise be ready to mesmerize or off tank one.
When all the hatchlings are dead, the named Enraged Maternal Cragbeast spawns. She also has fairly wide aggro but can react slowly to a charge. Usually I advise groups to come up to the top of the hill carefully, then edge in using HoTT to watch for the first aggro of her or to have the puller kite to the right side while the group runs in and sets up. She hits for approximately 1800 max, triples and rampages but her hps are lower than most of the trash mobs it seems. A group can often take her down within 20-30seconds if roughly EP equipped. Riposte disc or Weapon shield tanking her till slowed can help lesser equipped groups beat her fairly easily. She drops 1 of 3 augments every time and has 100% chance of a Cell A for the Breakdown in Communications quest.
Once she's dead, move the group in to just past the rock slightly and your safe from repops/patrollers behind you and can then med to full, take a break, afk's etc. This is a safe room when she's dead if no one is too near the 2 canyon's entrances.
Third Section, Enraged Maternal Cragbeast's (dead) room to Undead Room
Usually there's 1 patroller for this area, I think I've seen a second patroller but its been rare if its not just a bad memory. Generally you start this section by pulling the first pop, a Golem (almost always?), then the patroller, then everything up to the first landing/left turn back down to your safe room. Then move up, look left uphill and you'll see a Golem again. He's sitting on your next camp, edge up and then have the tank rush him. You can safely fight where he is, just don't move past him.
Now, when the Golem is dead you'll see a set of walls ahead and an open room beyond. Do NOT go in. Originally when I first tried these trials I thought 3 people had to go in invisible or invisible to undead but to trigger the Undead pops due to advice from other groups. However after a few trials I realized that if your group is setup near where the Golem is, that's almost close enough to trigger the pops. At worst you can have people move up 6' or something then back, its really not far and you don't want to move even half the distance to those stone walls.
This undead room has no repops other than the named (don't need to kill, its a story mob) when cleared so its safe to med if your group is struggling and you've cleared enough to get a wide clear area (see following on how they are setup).
There are 4 undead npc's outside, and 2 in each room to the side. The rooms will aggro you if you go between the doors that face each other so leave that till last. The first two can be pulled without even entering the room. Simply have your puller go about 3 feet up the left wall, run up until he's about to hit the Stone wall at the room entrance and the one on the right will see your puller diagonally while the left side front one can't see him. Pull that back to the group and kill it, and its chain pop.
Next pull the left front one by having your puller run up the right side. Kill it and it's chain pop.
Third is a bit trickier, have your puller go inside the room and edge right a bit. Making sure not to reach the buildings, have him move up on the right side a bit(2/3rd from the left zone wall, 1/3rd from the right, still several feet left of the right building) and the right side one of the two remaining outdoor pops will aggro. This is tricky but if you move a few feet at a time you don't need FD or anything. Kill that 3rd one and its chain.
Repeat the same as above but along the left side, just before you'd reach the door on the left you should get the 4th mob to aggro. If your too near the middle of the room though you could get aggro from the right side building.
Next step depends on your group. If you have a mesmerizer with good hps or a strong off tank then its no problem to pull 2, if you don't then its painful and potentially deadly. Your possibly running out of time before repops behind you also depending on your dps and pull speed. I've used a few tricks to do this depending on what the group has available. If you have FD puller and some time you can split a hut provided everyone's far back.
If your running low on mana, simply don't pull the last 4 mobs yet. Move carefully into the room and meditate to the right side of the tree on the right side. You can get to full mana, and clear backwards when ready to make space or use one of many techniques to deal with double pulls.
First, pre-target the mobs in the right side building with Function key 9 (F9). Your targetter can stand at the corner of the building and swing his view around to pre-target one to mesmerize, and one for your tank to target. Pull them to your corner and kill the 2 and their chain pops. If your tank has AE taunt, he can taunt them through the wall to aggro them and build some hate before they come instead.
Pull the left building's two to the front corner safe spot when your ready again. There's no time limit other than the 6 hour trial time to be concerned with. Most groups won't need a long pause if any, but its there if you need it.
When the last of the 8 initial mobs and 8 chain pops are dead, a named pops in the center. By standing on the hillside on the right side you can consider him and see if your KoS. Anyone KoS can get an invisible to undead spell cast on them and move past the named when the group's ready for the next section, he can see invisible but not invisible to undead. This is another natural break spot to med to full, take any afk's, go through strategies for the next section.
For those doing the Breakdown in Communications quest the Cell B here off the undead is very streaky, with some clearings having none and others having 4 drop. I'd advise keeping the B Cell, C Cell (later area) if you see one drop, the A, D, E cells can generally wait for later with E being slightly harder since not all groups pass the trial.
Fourth Section, Undead to Gate of the Gater's to the Riddle Gate
This partly has two separate sections with the room in the middle being the dividing line. There's about 3 to 4 pops between the undead room and the gate at the top of the canyon, including at least 1 patroller. Usually there's a golem on the first landing with a mob to its right slightly, and a Pooka near the top gate. Clear up to the Pooka and setup on its spawn point.
The gate ahead is not locked and you can pull mobs through from the next room. The mobs inside do NOT repop, and the only real goals are a) to clear an area to med away from the canyon, b) to get a Harshly spiked key (its NO TRADE, and needed to open the final gate later on, your puller should loot this or a rogue to open the door/get pullers corpse if something goes wrong). The C Cell for the Breakdown in Communications drops off these mobs as a rare drop, seems about 1 in every 2 full clearings, and since they don't repop you need a second trial to get a second clearing.
This next area a bunch of gater's, everything runs and can be a real pain if anything goes wrong. Despite how packed the room looks its actually mostly single pull able if done in the right order and with some luck. If I remember right: pull the Mastruq to the center left, then the Ikaav, then the Anuek. All three guard the direct path to the next canyon. There's an Anuek and Ra'tuk on the right that can be pacified (but not ranger pacify?) to split. If you clear those two, you can then pull the right Ikaav single, then the right Mastruq single.
Anywhere inside the room away from gate or the far canyon is safe to med when cleared. Once you have the key (random drop remember) you can stop, meditate to full and start clearing the next canyon. There's usually 1-2 patrollers there and 3-5 static pops. Clear them all up to the first landing in one fast set, then setup there and pull any others between you and the Riddler to the landing/dogleg
One person, goes up to the Riddler to ask him the trigger phrases while the other 5 stand well back. The Riddler (like the earlier ghost named) can be KoS to some people, they are on the same faction. Say to him 'test' and he will spawn 14?15? bags, each is the answer to a different riddle. Pick up all 14?15? items first, then say 'ready' and he will give you the riddle. One of the items will be the correct reply, give him the item and he'll unlock the door. If he gets the wrong item, a group of mobs charge you through the gate.
Riddles (in no particular order) from http://everquest.allakhazam.com posters, one of them might be fake
r1) When young, I am sweet in the sun. When middle-aged, I make you
happy. When old, I am valued more than ever.
a1) Wine
r2) I scribbled forms of the finest letter. Repel elements of the harshest
weather I am an Arrow-Aimer and a dust breaker
a2) Feather
r3) It floats on water, light as can be. A thousand men can't lift it free.
a3) Bubble
r4) I'm offered to the loved, and also to the dead. I come in many varied
hues, most notably red. My pricks are known to pierce the skin, often resulting
in wounds that bled.
a4) Rose
r5) What can be held in the left hand, but not in the right hand.
a5) Right hand
r6) I'm always hungry, I must always be fed, The finger I lick will soon turn
red.
a6) Fire
r7) Who makes has no need of it. Who buys has no use of it. Who uses it can
neither see nor feel it.
a7) Coffin
r8) I help to mature your spirits. When moisten I fulfill my purpose. Should
I dry out, my task will fail and my quarry may be worthless.
a8) Cork
r9) I build up castles. I tear down mountains. I make some men blind, I help
others to see. What am I?
a9)Sand
r10) When I am filled I can point the way, When I am empty Nothing moves me,
I have two skins One without and one within.
r10) Glove
r11) Lovely and round, I shine with pale light, grown in the darkness, A
lady's delight.
r11) Pearl
r12) I drive men mad for love of me, Easily beaten, Never free.
a12) Gold
r13) (not exact: I scream across the sky.... fade and nothing left of me...)
a13) Fireworks
r14) my life is measured in hours. I serve by being devoured. Thin, I am
quick, Fat I am slow. wind is my foe......Candle
a14)Candle
r15) My mouth bears whiskers but no teeth. i have scales but i do not
weigh. you can bait me with delicious food but please, no drink today.
a15) Catfish
When the door unlocks, you click it, invisible to undead any KoS people and run up into the next room. This room (between Fourth Section and Fifth Section has no mobs, you basically can med again there, take afk's, and discuss strategies. You don't want to be doing the riddle as repops happen behind so clear canyon fast and have your best riddles person do it..
Fifth Section, The locked gate and Kyv Heartstriker Jhiru